Table Of Contents
- 1 Secure Your Organization’s Email from Spam, Malware, and Phishing Attacks with Defender for Office 365
- 2 Configure Anti-Phishing Policies
- 3 Configure Custom Inbound Anti-Spam Policy
- 4 Configure Outbound Custom Anti-Spam Policy
- 5 Configure Anti-Malware Policy
- 6 Review Security Reports and Alerts
- 7 Educate Users and Foster Security Awareness
- 8 Best Practices for User Security:
- 9 Conclusion
- 10 FAQs:
- 11 About The Author
Secure Your Organization’s Email from Spam, Malware, and Phishing Attacks with Defender for Office 365
In today’s digital age, cyber threats are becoming increasingly sophisticated, and securing your Office 365 environment is more important than ever. Microsoft Defender for Office 365 (formerly Office 365 Advanced Threat Protection) is a powerful security tool designed to protect your organization from phishing, malware, and other threats targeting your Office 365 environment. In this step-by-step guide, I will walk you through how to use Defender for Office 365 to secure your Office 365 account and data effectively.
Why Use Defender for Office 365?
Microsoft Defender for Office 365 provides robust protection against various types of cyber threats, including:
- Phishing: Identifies malicious email campaigns that try to trick users into disclosing sensitive information.
- Malware: Scans and blocks email attachments containing malware or ransomware.
- Spoofing: Detects unauthorized senders pretending to be trusted sources.
- Advanced Threats: Monitors for zero-day attacks and sophisticated social engineering tactics.
By leveraging Defender for Office 365, businesses can enhance their security posture, prevent data breaches, and maintain business continuity.
To access Microsoft Defender for Office 365 from your Microsoft 365 admin center, click on Security as shown below.

Click on Threat Policies.

Click on Preset Security Policies. You can turn on the preset security policy by clicking on the toggle if you want. Click on the hyperlink Manage protection settings to edit the policy. Click here to learn more about the difference between standard protection and strict protection from Microsoft Learn.

To be flexible, be in control and tailor the policies to your organization’s needs, we are going to configure the policies manually. Let’s start by creating a quarantine policy. Click on Threat Policies, and under Rules, click Quarantine Policies.

Click on the Global settings to customize email notifications that go out to the recipients who receive a message that has been quarantined.

Click on Add Custom policy and give your policy a name. Click the Next button.

Select the recipient message access. You have two options to choose from: Limited access or Set specific access (Advanced). With limited access, recipients can preview messages, request messages to be released, delete messages, and allow senders, but recipients can’t release messages from quarantine.
Set specific access (Advanced) allows you to customize your policy further. Select the right access for your organization based on your organization’s needs and the level of your employee’s cybersecurity awareness. For this example, I will select Set specific access (Advanced).
Let’s assume that our users are cybersecurity-aware and well-trained because people will generally do the right thing if they know what to do. In the drop-down, select Allow recipients to release a message from quarantine, and check the boxes next to what action you want them to be able to take, as shown below. Click the Next button.

Check the box next to Enable to enable the policy and leave the default option on. Click the Next button.

Review your policy and click the Submit button.

Next, we are going to create different policies. Under Policies, click Anti-phishing.
Configure Anti-Phishing Policies
Phishing attacks are among the most common threats targeting Office 365 users. Defender for Office 365’s anti-phishing policies can help prevent such attacks. Follow these steps to configure them:
Click on Email & collaboration >Policies & rules > Threat policy> Anti-phishing

Click Create

Give your policy a name and click the Next button.

You can list users that you want this policy to apply to, group, or your organization’s own domains. For this example, I will add a domain. You can also exclude users, groups, or domains by checking the box next to Exclude these users, groups, and domains.

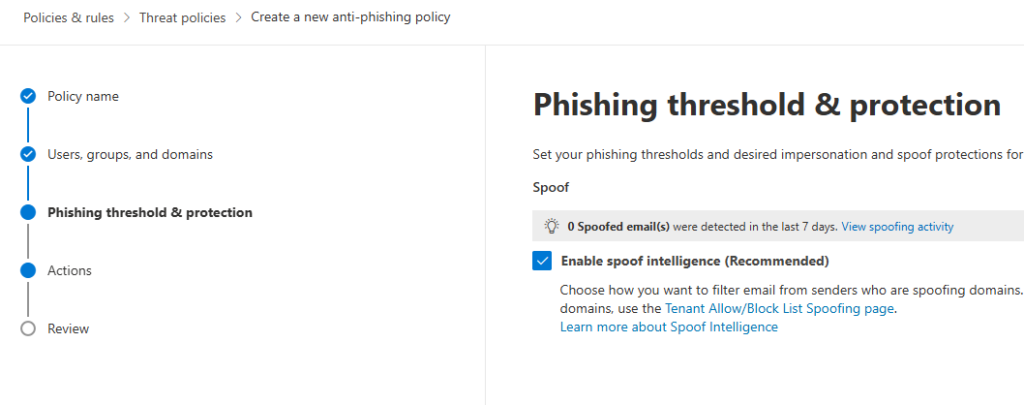
Check the box next to Enable Mailbox Intelligence (Recommended), as shown below, and click the Next button

For If the message is detected as spoof and DMARC Policy is set as p=quarantine, Select Quarantine the message.
For If the message is detected as spoof and DMARC Policy is set as p=reject, select Reject the message.
For If the message is detected as spoof by spoof intelligence, Select Quarantine the message.
For Apply quarantine policy, select the Custom Quarantine Policy created earlier.
Check all the boxes for Safety tips and indicators to turn them on. Click the Next button.

Review your policy and click on the Submit button.

The anti-phishing policy has been successfully created.

Configure Custom Inbound Anti-Spam Policy
Click Email & collaboration >Policies & rules > Threat policy >Anti-spam

ClickCreate policy >Inbound

Give your policy a name and click the Next button.

You can list users that you want this policy to apply to, group, or your organization’s own domains. For this example, I will add a domain. You can also exclude users, groups, or domains by checking the box next to Exclude these users, groups, and domains.

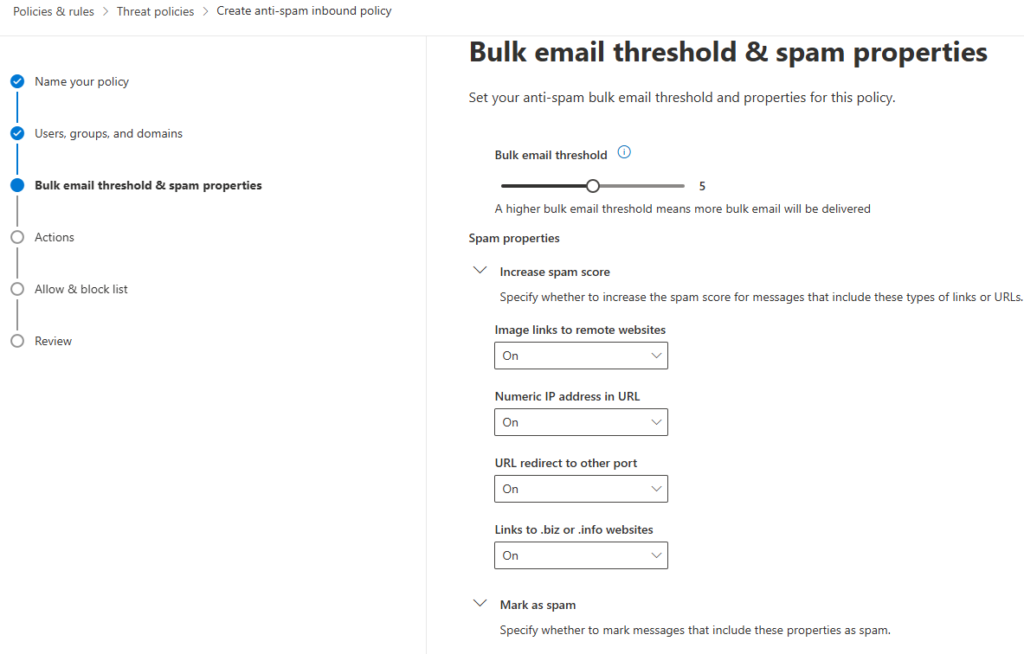
Set the Bulk email threshold based on your needs. The default is 7. A higher bulk email threshold means more bulk emails will be delivered to the receivers. The standard threshold is 6, and the strict is 5. See the screenshot below and click here to learn more.

You can set it to 5 or 6 at the beginning. Monitor and adjust as needed. customize spam property as needed to Increase spam score. For this example, I will turn them on, as shown below. Leave everything else as default and click on the Next button.

On the action page, set the Spam, High confidence spam, Phishing, High confidence phishing, and Bulk complaint level (BCL) met or exceeded to Quarantine the message and select the Custom Quarantine Policy created earlier. Leave Intra-Organizational messages to take action on as Default. Decide how many days you want to retain the span in quarantine. For this example, I will set Retain spam in quarantine for this many days to 30 days. The default is 15. Leave everything else as default and click the Next button.


On the Allow & block list page, you can allow or block senders and domains. For this example, I will leave this as default.

Review and click on the Create button.

The Inbound Anti-Spam Policy was successfully created and turned on.

Note: I updated the policy name to reflect inbound. See below.

Configure Outbound Custom Anti-Spam Policy
Click Email & collaboration >Policies & rules > Threat policy >Anti-spam >Create policy >Outbound

Give your policy a name and click on the Next button.

You can list users that you want this policy to apply to, group, or your organization’s own domains. For this example, I will add a domain. You can also exclude users, groups, or domains by checking the box next to Exclude these users, groups, and domains.

Set Protection settings for the outbound anti-spam policy based on your organization’s needs. I will set the sending limit to Strict recommendations by Microsoft, as shown below. Click here to learn more.

Set an external message limit to 400
Set an internal message limit to 800
Set a daily message limit to 800
Set Restriction placed on users who reach the message limit to Restrict the user from sending email.
You can add your IT to be notified by choosing an option under Notifications. I will leave that as default for this example. Click the Next button.

Review and click on the Create button.

Both inbound and outbound anti-spam policy was created successfully. See below

Configure Anti-Malware Policy
Click Email & collaboration >Policies & rules >Threat policy >Anti-Malware

Click Create

Give your policy a name and click the Next button.

You can list users that you want this policy to apply to, group, or your organization’s own domains. For this example, I will add a domain. You can also exclude users, groups, or domains by checking the box next to Exclude these users, groups, and domains.

On the protection settings page, select Quarantine the message, check the box next to Enable zero-hour auto purge for malware (Recomended)

Review your policy and click on the submit button.

The anti-malware policy was created successfully. See below

Review Security Reports and Alerts
Microsoft Defender for Office 365 provides a comprehensive set of security reports and alerts to help you stay on top of any ongoing threats. Here’s how to monitor them:
- In the Defender portal, click on Reports and choose Email & Collaboration Reports.
- Review the reports to identify any detected threats, such as phishing attempts or malware attachments.
- You can set up custom alerts for various threat scenarios. Click Email & collaboration >Policies & rules >Threat policy >Alert policy
By continuously monitoring your reports and alerts, you can stay proactive in responding to potential threats.
Educate Users and Foster Security Awareness
While Defender for Office 365 offers excellent technical protection, user awareness is key to maintaining a secure environment. Regular security awareness training sessions are important to help your employees recognize phishing emails, suspicious links, and potentially dangerous attachments.
Best Practices for User Security:
- Encourage users to never click on unsolicited links or attachments.
- Advise them to report suspicious emails immediately to IT.
- Use multi-factor authentication (MFA) to further secure accounts.
Conclusion
Securing Office 365 with Microsoft Defender for Office 365 is an essential step in protecting your organization against modern cyber threats. By following these steps to configure anti-phishing, anti-spam, and anti-malware and reviewing security reports, you can dramatically reduce the risk of a successful attack. Moreover, educating users and fostering a culture of security awareness will further strengthen your defenses. Implementing these best practices and regularly reviewing your security posture will help ensure that your Office 365 environment remains secure, safe, and productive.
FAQs:
- Is Microsoft Defender for Office 365 included in Office 365 Business Premium? Yes, it is included with Microsoft 365 Business Premium and Microsoft 365 Enterprise E5 subscriptions.
- Can I use Defender for Office 365 with a Microsoft 365 Business Basic license? No, Defender for Office 365 is only available with certain premium licenses, such as Microsoft 365 Enterprise E5.
- How often should I review security reports in Defender for Office 365? It’s recommended to review security reports weekly or more frequently if your organization is experiencing heightened risk.
