Table Of Contents
- 1 How to Manage Organizational Units (OUs) in Active Directory with PowerShell
- 2 Example 2: Create an OU Under Another OU
- 3 Example 3: Create an OU with Additional Properties
- 4 Example 4: Create multiple Organizational Units (OUs) Using Powershell
- 5 How to Delete a Protected OU
- 6 How to Delete Multiple Protected Organizational Units (OUs)
- 7 Method 3: Deleting OUs Using a Text File (Bulk Deletion)
- 8 Conclusion
- 9 About The Author
How to Manage Organizational Units (OUs) in Active Directory with PowerShell
In Active Directory (AD), Organizational Units (OUs) play a crucial role in structuring and managing your network resources. Whether you’re organizing users, computers, or other AD objects, OUs help streamline administration and security. However, there may come a time when you need to create, delete, or manage multiple OUs in bulk. In this post, I will walk you through the essential PowerShell commands for creating, deleting, and verifying the existence of OUs in Active Directory. Whether you’re managing a small network or handling a large-scale environment, these PowerShell techniques will save you time and effort, enabling efficient Active Directory administration.
Step-by-Step Guide
We will create a new Organizational Unit (OU) in the Root of the Domain. Open PowerShell as Administrator and run the command below.
New-ADOrganizationalUnit -Name "BuildingA" -Path "DC=example,DC=com"This example creates an OU named BuildingA at the root of the domain example.com as shown in the screenshot below.
- -Name: Specifies the name of the new OU (in this case, “BuildingA”).
- -Path: Specifies the domain where you want to create the OU. This is the distinguished name (DN) of the domain, which is “DC=example,DC=com” for the example.com domain.

Verify that the OU was successfully created
Get-ADGroup -Filter * -SearchBase "OU=BuildingA,DC=example,DC=com"
Example 2: Create an OU Under Another OU
If you want to create a nested OU (for example, a Department OU under an existing BuildingA OU), you can specify a more complex path.
New-ADOrganizationalUnit -Name "Department" -Path "OU=BuildingA,DC=example,DC=com"This command creates a Department OU within the existing BuildingA OU in the example.com domain.

Example 3: Create an OU with Additional Properties
You can also specify additional properties, like a description or other attributes, by using the command below. Adding -Description adds a description to the OU. For this example, the command below adds “Finance Department OU” to the description.
New-ADOrganizationalUnit -Name "BuildingA" -Path "DC=example,DC=com" -Description "Finance Department OU"Example 4: Create multiple Organizational Units (OUs) Using Powershell
To create multiple Organizational Units (OUs) such as IT, HR, Sales, Marketing, Security, and Finance in Active Directory (AD) using PowerShell, you can either create them one by one or use a loop to automate the process. Below are examples of both approaches.
Method 1: Creating Each OU One by One
You can run individual commands to create each OU separately using the command below. Modify the command to meet your needs.
# Create 'IT' OU
New-ADOrganizationalUnit -Name "IT" -Path "DC=example,DC=com"

# Create 'HR' OU
New-ADOrganizationalUnit -Name "HR" -Path "DC=example,DC=com"

# Create 'Sales' OU
New-ADOrganizationalUnit -Name "Sales" -Path "DC=example,DC=com"

# Create 'Marketing' OU
New-ADOrganizationalUnit -Name "Marketing" -Path "DC=example,DC=com"

# Create 'Security' OU
New-ADOrganizationalUnit -Name "Security" -Path "DC=example,DC=com"

# Create 'Finance' OU
New-ADOrganizationalUnit -Name "Finance" -Path "DC=example,DC=com"
Click on the green play button to run the command, and you should have a successful output similar to the screenshot below.

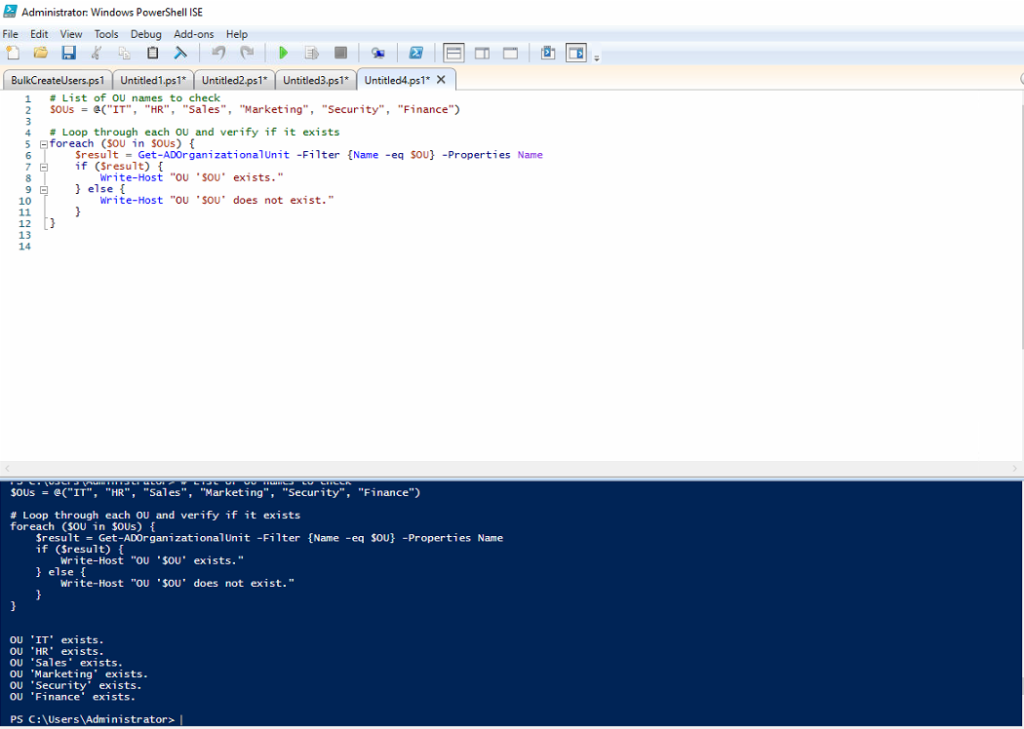
Verify that the OUs were successfully created by running the code below.
You should have a screenshot similar to the one below.

You can also verify by navigating to Active Directory Users and Computers.

Method 2: Using a Loop to Create Multiple OUs in One Go
If you prefer to automate the process of creating these OUs in a loop, here’s how you can do it:
# Define a list of OU names
$OUs = @("IT1", "HR1", "Sales1", "Marketing1", "Security1", "Finance1")

# Loop through each OU name and create it
foreach ($OU in $OUs) {
    New-ADOrganizationalUnit -Name $OU -Path "DC=example,DC=com"
    Write-Host "Created OU: $OU"
}

Verify that the OUs were successfully created by navigating to your Organizational Unit (OU). Control Panel> All Control Panel Items> Administrative Tools> Active Directory Users and Computers.

How to Delete a Protected OU
Important Considerations Before Deleting a Protected OU
Make Sure You Have Permissions: You need to have the appropriate administrative permissions to remove protections and delete OUs in the Active Directory.
Objects Inside the OUs: If there are objects (such as users, groups, or computers) inside the OUs, you need to either delete or move those objects before you can delete the OU. If the OU is not empty, you will encounter an error. To handle this, you can either use Get-ADObject to retrieve the objects in the OU and delete them or move the objects to another location before deleting the OU.
Modify the example command below to delete all users inside the OU before deleting it:
# Delete all users in the IT OU
Get-ADUser -Filter * -SearchBase "OU=IT,DC=example,DC=com" | Remove-ADUser -Confirm:$false

# Now delete the IT OU
Remove-ADOrganizationalUnit -Identity "OU=IT,DC=example,DC=com" -Confirm:$false
Accidental Deletion Protection: The -ProtectedFromAccidentalDeletion flag is a safety feature. Make sure you intend to delete the OUs before bypassing this protection.
Use -WhatIf to Test: If you’re unsure and want to preview the actions without actually performing them, you can add the -WhatIf parameter to the Remove-ADOrganizationalUnit cmdlet to simulate the deletion:
Remove-ADOrganizationalUnit -Identity $ouDN -WhatIfBy default, OUs are protected from accidental deletion. To delete a protected Organizational Unit (OU) in the Active Directory, you must first remove the protection from accidental deletion of the OU.
Method1: Using Powershell
# Remove accidental deletion protection and then delete the 'IT' OU
Set-ADOrganizationalUnit -Identity "OU=IT,DC=example,DC=com" -ProtectedFromAccidentalDeletion $false
Remove-ADOrganizationalUnit -Identity "OU=IT,DC=example,DC=com" -Confirm:$false
Method2: Delete a protected OU Manually (GUI)
Navigate to your Organizational Unit (OU). Control Panel> All Control Panel Items> Administrative Tools> Active Directory Users and Computers. Right-click on the OU you want to delete and click Property. For this example, I want to delete the Department1 OU, as shown in the screenshot below.

Click on the Object tab and uncheck the checkbox next to Protect object from accidental deletion. Click Apply and Okay.

Next, right on the OU, you want to delete again, and this time, you will click on Delete. For this example, I will delete the Department1 OU, as shown in the screenshot below.


How to Delete Multiple Protected Organizational Units (OUs)
To delete multiple protected Organizational Units (OUs) in Active Directory, you must first remove the protection from accidental deletion for each OU. Once the protection is removed, you can then proceed to delete the OUs.
Here’s a step-by-step guide on how to handle this task using PowerShell:
First, remove the protection from each OU by setting the ProtectedFromAccidentalDeletion property to $false. After the protection is removed, you can delete the OUs. You can either do this for each OU individually or automate the process for multiple OUs.
Method 1: Deleting Multiple Protected OUs Individually
You can remove the protection and then delete each OU by specifying its distinguished name (DN). For this example, I am going to remove the OUs created earlier named “IT1”, “HR1”, “Sales1”, “Marketing1”, “Security1”, and “Finance1.” Using the PowerShell script below. Please modify the script to include your information.
# Remove accidental deletion protection and then delete the 'IT' OU
Set-ADOrganizationalUnit -Identity "OU=IT,DC=example,DC=com" -ProtectedFromAccidentalDeletion $false
Remove-ADOrganizationalUnit -Identity "OU=IT,DC=example,DC=com" -Confirm:$false

# Remove accidental deletion protection and then delete the 'HR' OU
Set-ADOrganizationalUnit -Identity "OU=HR,DC=example,DC=com" -ProtectedFromAccidentalDeletion $false
Remove-ADOrganizationalUnit -Identity "OU=HR,DC=example,DC=com" -Confirm:$false

# Repeat for other OUs...
Click the green play button and you should have something similar to the screenshot below.

The OUs have been deleted and no longer exist. Verify that the OUs were successfully deleted by navigating to your Organizational Unit (OU). Control Panel> All Control Panel Items> Administrative Tools> Active Directory Users and Computers.

Method 2: Removing Protection and Deleting Multiple OUs in a Loop
If you have multiple OUs to delete, you can automate the process with a loop. This method will first remove the accidental deletion protection for each OU and then delete them. For this example, I am going to delete the OUs created earlier named “HR”, “Sales”, “Marketing”, “Security”, and “Finance.” Using the PowerShell script below. Please modify the script to include your information.
# List of OUs to delete
$OUs = @("HR", "Sales", "Marketing", "Security", "Finance")

# Loop through each OU and remove protection, then delete
foreach ($OU in $OUs) {
    $ouDN = "OU=$OU,DC=example,DC=com"

    # Remove protection from accidental deletion
    Set-ADOrganizationalUnit -Identity $ouDN -ProtectedFromAccidentalDeletion $false
    Write-Host "Removed protection from OU: $OU"

    # Delete the OU
    Remove-ADOrganizationalUnit -Identity $ouDN -Confirm:$false
    Write-Host "Deleted OU: $OU"
}

Explanation of the Script:
- $OUs: An array containing the names of the OUs you want to delete (e.g.,
IT,HR,Sales, etc.). - Set-ADOrganizationalUnit: This cmdlet is used to remove the accidental deletion protection from each OU (
-ProtectedFromAccidentalDeletion $false). - Remove-ADOrganizationalUnit: Once protection is removed, the
Remove-ADOrganizationalUnitcmdlet is used to delete the OU (-Confirm:$falsebypasses the confirmation prompt). - Write-Host: This prints messages to indicate the success of each operation.
The OUs have been deleted successfully. Verify that the OUs were successfully deleted by navigating to your Organizational Unit (OU). Control Panel> All Control Panel Items> Administrative Tools> Active Directory Users and Computers.

Method 3: Deleting OUs Using a Text File (Bulk Deletion)
If you have a large number of OUs stored in a text file, you can read the file and loop through it to remove the protection and delete each OU.
Step 1: Prepare a text file (ous-to-delete.txt) with OU names:
IT
HR
Sales
Marketing
Security
Finance
Step 2: Use this PowerShell script to process the file:
# Read the list of OU names from the file
$OUs = Get-Content "C:\path\to\ous-to-delete.txt"

# Loop through each OU name
foreach ($OU in $OUs) {
    $ouDN = "OU=$OU,DC=example,DC=com"

    # Remove protection from accidental deletion
    Set-ADOrganizationalUnit -Identity $ouDN -ProtectedFromAccidentalDeletion $false
    Write-Host "Removed protection from OU: $OU"

    # Delete the OU
    Remove-ADOrganizationalUnit -Identity $ouDN -Confirm:$false
    Write-Host "Deleted OU: $OU"
}
Conclusion
Efficient management of Organizational Units (OUs) in Active Directory is essential for maintaining a well-structured and secure network environment. Using PowerShell to create, delete, and manage OUs not only automates these processes but also simplifies bulk operations, especially when dealing with large numbers of OUs. By understanding the important commands like New-ADOrganizationalUnit, Remove-ADOrganizationalUnit, and Get-ADOrganizationalUnit, you can effectively manage your AD environment with minimal effort. Remember to always verify the existence of OUs and be cautious when deleting protected OUs to prevent accidental data loss. With these best practices, you’ll ensure smooth Active Directory operations, helping you maintain an organized, efficient, and secure IT infrastructure.
