As cybersecurity threats continue to grow, organizations and individuals need to assess the security of their systems regularly. One way to do this is through vulnerability scanning. A process that helps identify weaknesses in a system that malicious actors could exploit. In this guide, we will explore how you can intentionally make a Windows 10 machine vulnerable to attack for vulnerability scanning/penetration testing purposes.
How to make a Windows 10 machine vulnerable to attack for vulnerability scanning purposes
1. Turn Off Firewall and Antivirus: One of the first steps in making a Windows 10 machine vulnerable is to turn off the firewall and anti-virus. Windows 10 has a built-in firewall and Windows Defender antivirus software to protect your system from threats. Disable both the firewall and antivirus to make your machine vulnerable. This leaves your system unprotected against viruses, malware, and other malicious activities.
2. Disable Security Updates: Security updates are critical for patching known vulnerabilities in the operating system and other software installed on the machine. Disabling automatic updates leaves your system exposed to any existing security flaws.
3. Install Old/Outdated Software: Installing outdated software is another way to introduce vulnerabilities into your Windows 10 machine. This includes installing outdated applications, plugins, operating system versions, and web browsers. Older software versions may have known security issues that have been patched in later releases. By using outdated software, you increase the risk of exploitation.
4. Enable Remote Desktop Access: Enabling Remote Desktop access on your Windows 10 machine can create a potential entry point for attackers. Remote Desktop allows remote connection to your system, which can be exploited by malicious actors if not properly secured. Enabling this feature without a proper security measure makes your machine more vulnerable to attacks.
Now that you have a good understanding of what this post is all about. Let’s proceed to making our Windows 10 Machine vulnerable.
Download and install some old version software on your Windows 10 machine
- Click here to download an old Version of VLC Player
- Click here to download an old version of Firefox
- Click here to download an old version of Internet Explorer
- Click here to download an old Version of Adobe Reader
Install the old/ outdated version software listed above and restart your Windows 10 Machine.
Next, we will make the following changes to our Windows 10 target/vulnerable machine:
- Enable File Sharing
- Turn firewall off
- Enable Remote Registry Service
- Configure User Access Control (UAC)
- Change Remote UAC Settings
How to enable file sharing in Windows 10
Click on the network icon at the lower right of your screen. Click on Network & Internet settings highlighted in blue.
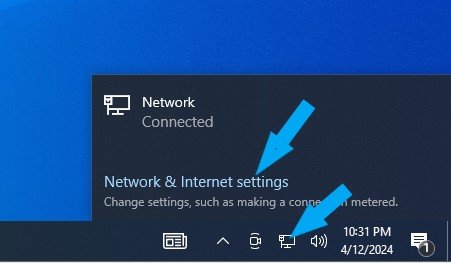
Click Network and Sharing Center. Click the Change Advanced Sharing Settings link on the left.

Click the Change Advanced Sharing Settings link on the left.

Under Guest or Public (Current Profile), turn on network discovery and turn on file and printer sharing. As shown below, click on the Save Changes button.

Ensure these settings are correct. For All Networks, turn off Public Folder Sharing and turn on Password Protected Sharing.

Next, we are going to turn the Windows firewall off.
How to turn Windows Defender off
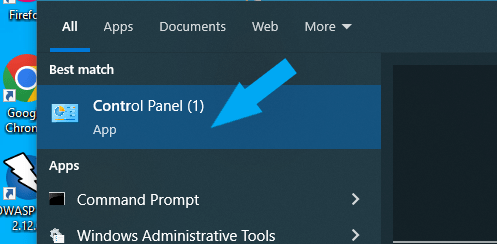
In the search box, type Control Panel.

Then click Control Panel.
To easily locate Windows Defender Firewall, change your “view by” on the top right to small icons.
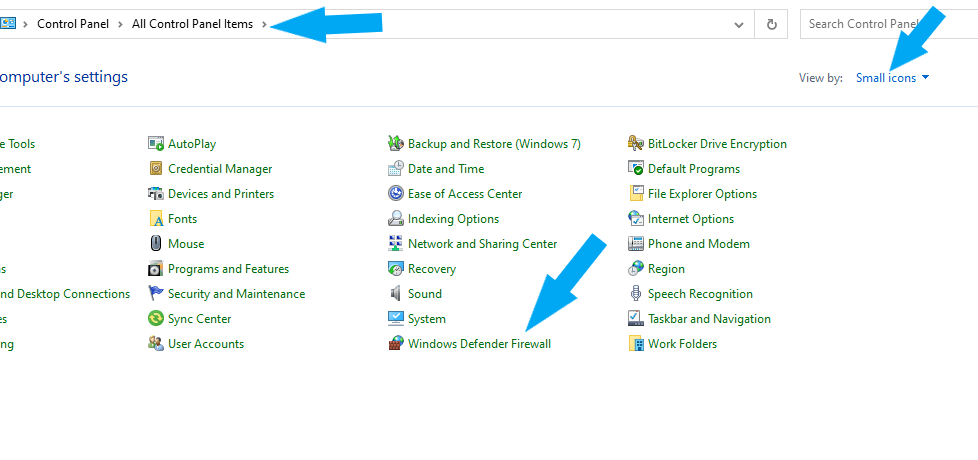
Click Windows Defender Firewall > Turn Windows Defender Firewall on or off

Check the radio button next to Turn off Windows Defender Firewall (not recommended) under Domain Network Settings. Check the radio button next to Turn off Windows Defender Firewall (not recommended) under Private Network Settings. Check the radio button next to Turn off Windows Defender Firewall (not recommended) under Public Network Settings. Then click the OK button to save the changes.
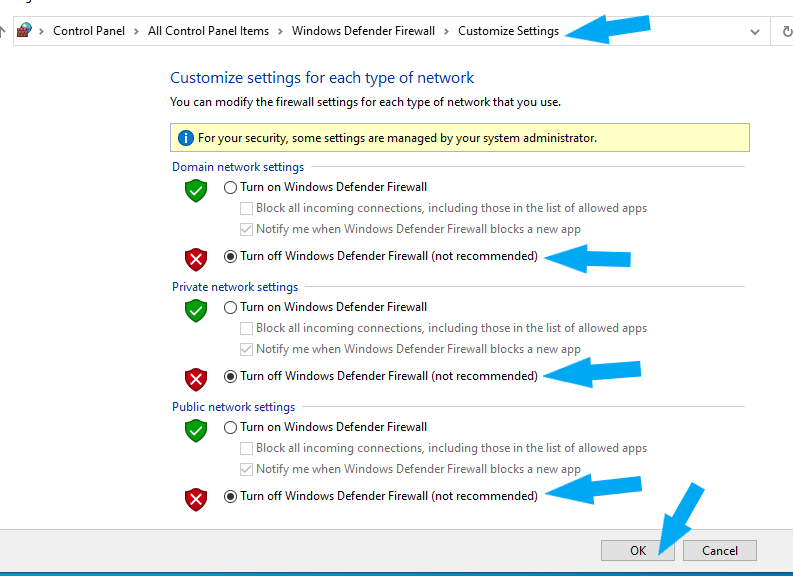
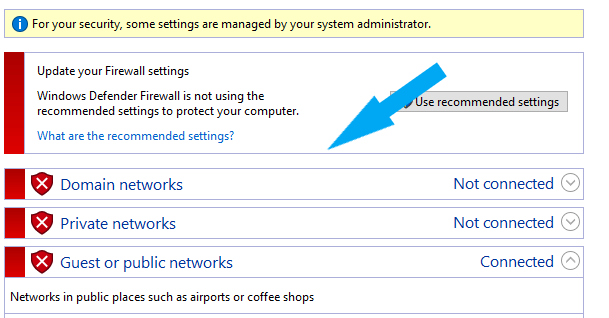
Windows Defender Firewall was successfully turned off. Your screen should look similar to the screenshot below.
Click here to learn about Windows Defender.
Let’s Enable Remote Registry Service
How to Enable Remote Registry Service in Windows 10
In the search box, type Service.

Click on services

Look for Remote Registry. and right-click on it.

Click on Properties, and change Startup Type from Manual to Automatic to start automatically at reboot. Click Apply and click OK.

Finally, let’s configure User Access Control (UAC). We need to disable User Access Control (UAC.
How to disable User Access Control (UAC) in Windows 10
Log in to your Windows 10 as an administrator. In the search box, type Contol Panel.

Click on Contol Panel. Change the view by: to small icons on the top right for easy access.

Click on User Accounts.

Click Change User Account Control Settings.

Move the slider down to Never Notify. Click OK.

Click Yes on the User Account Control prompt. Restart the machine for the changes to take effect.

How to Change Remote UAC Settings
Launch Registry Editor by typing run in the search box as shown below.

Open type regedit.exe and click the OK button to open it. You may need to run it in administrator mode to perform this action.

- Navigate to HKEY_LOCAL_MACHINE hive.
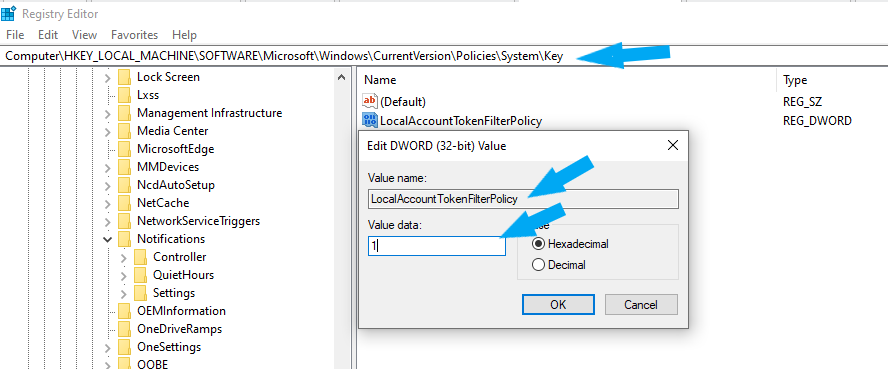
- Open SOFTWARE\Microsoft\Windows\CurrentVersion\Policies\System key.
- Create a new DWORD (32-bit) value with the following properties: Name: LocalAccountTokenFilterPolicy
Value: 1, as shown below. - Click the OK button to close the Registry Editor.
We will perform a vulnerability assessment on this Windows 10 machine in our next lab. Click here to learn. Happy Learning!
References
https://cdn2.qualys.com/docs/qualys-authenticated-scanning-windows.pdf
