Ubuntu Desktop is one of the most user-friendly Linux distributions available. Running it in a virtual machine (VM) using VMware Workstation or other virtualization is an excellent way to try it out without altering your host. Whether you are new to Linux or want to use Ubuntu Desktop for testing and development, in this post, I will walk you through the step-by-step how to install Ubuntu Desktop in VMware Workstation.
Table Of Contents
What You’ll Need
Before you begin the installation process, make sure you have the following:
- Ensure VMware Workstation is installed on your computer. You can download it from the official VMware website.
- Download the latest Ubuntu Desktop ISO from the official Ubuntu website.
- A minimum of 4 GB RAM and 25 GB of disk space is required to run Ubuntu Desktop in a VM. Click here to learn more about hardware requirements. If your system has more resources, allocating additional memory or disk space can improve performance.
Create a Ubuntu Virtual Machine in VMware Workstation
Open the VMware Workstation and click on Create a New Virtual Machine to start the Virtual Machine wizard. Choose Typical (recommended) to use the default settings. Click on the Next button to proceed.

Choose the Installer Disc Image file (ISO) option. Click Browse to locate the Ubuntu Desktop ISO file you downloaded earlier. Click on the open button and click Next.

Enter your full name and create a username and password. Click the Next button.

Give your Virtual Machine a name, such as Ubuntu Desktop. Click on Browse to choose where to store your VM, and click the Next button.

Allocate disk space; as shown in the screenshot below, at least 25 GB of disk space is required for Ubuntu Desktop. I will allocate 100GB for this example. Select store virtual disk as a single file and click the Next button.

Customize Hardware (Optional)
Before starting the installation, you can adjust the virtual machine’s resources by clicking on the Customise Hardware button to allocate hardware resources based on your needs and click the Finish button.

- Memory: Allocate at least 2 GB of RAM to the virtual machine, but more is recommended if your host machine allows it.
- Processors: Set the number of processor cores you want to allocate to the virtual machine. For most users, 1 or 2 cores will suffice.
- Network Adapter: Use the default NAT setting unless you need to configure a bridged connection.
Once you’ve configured the resources, click Finish to create the virtual machine.
Start Ubuntu Installation
The VM will boot from the Ubuntu Desktop ISO. After a few seconds, you should see the Ubuntu installation menu. Select the language for the installation process; for this example, I will choose English.
Choose the keyboard layout that suits you (typically English (US)).

Choose Use wired connection and click Next.

Choose Install Ubuntu and click Next.

Choose Interactive Installation and Click Next.

Choose Default selection and click Next.

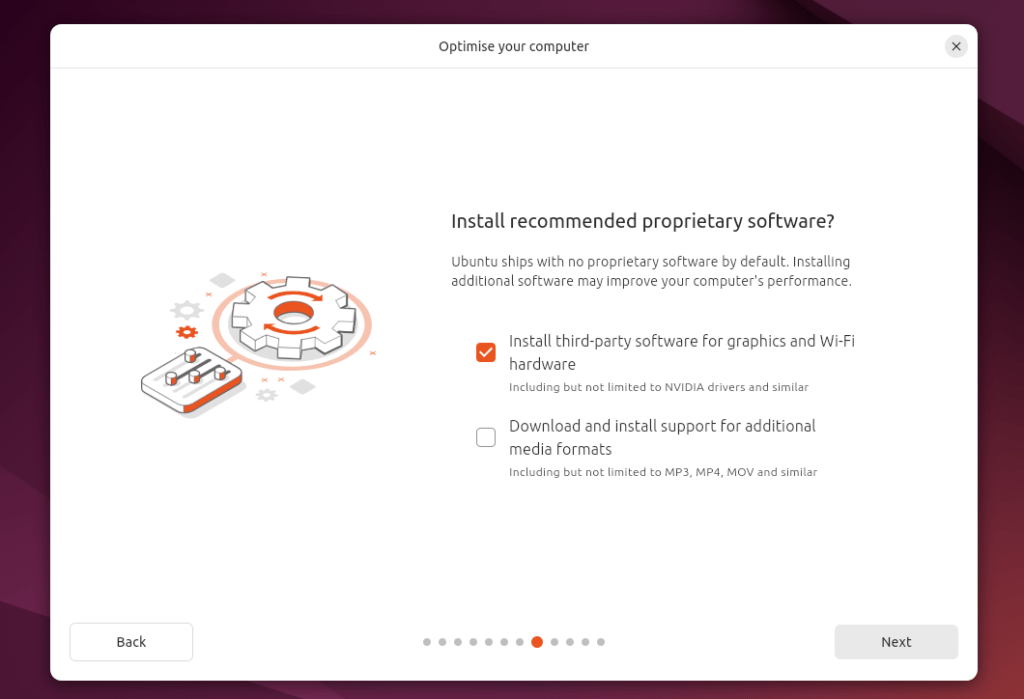
Choose Install third-party software for graphics and Wi-Fi hardware and click Next to optimize your computer.

Click Next > Next > Finish.
Installation was completed successfully.

Conclusion
Installing Ubuntu Desktop in VMware Workstation is an excellent way to run Ubuntu on your machine without altering your existing operating system. Whether you’re testing software, learning Linux, or creating a development environment, VMware provides a reliable and powerful virtualization solution. By following this step-by-step guide, you should now have Ubuntu up and running in VMware Workstation, ready for any tasks you want to perform in your virtual environment. Enjoy exploring Ubuntu and the world of virtualization!
