Table Of Contents
What is OpenVAS?
OpenVAS (Open Vulnerability Assessment System) is a leading free and open-source tool for vulnerability scanning and management, widely used by security professionals to identify and remediate vulnerabilities in their networks.
In this guide, I will provide a comprehensive and easy step-by-step approach to installing and configuring OpenVAS on Kali Linux.
Prerequisites
Before proceeding, ensure you have:
An up-to-date Kali Linux machine with Internet access for downloading packages. Click here to download Kali Linux VM if needed.
Basic knowledge of Linux commands and terminal usage.
How to Install OpenVAS
Install OpenVAS using the following command:
First, let’s upgrade our Kali Linux machine by running the command “sudo apt -get update” as shown in the screenshot below.
sudo apt -get update
The command “sudo apt-get update” updates your Kali Linux machine’s package index. The command contacts the repositories (the locations where software packages are stored). It downloads the latest lists of available packages and their versions, allowing your system to know which packages are outdated, new, or upgraded. Here’s a breakdown of what it does:
- sudo: This part of the command runs it with superuser (administrative) privileges, which are often required for installing or updating software.
- apt-get: This is a command-line tool for handling packages. It allows you to install, remove, and manage software packages.
- update: This specific command tells apt-get to refresh the local package index. The package index is a database that keeps track of the available software packages and their versions.
Importance of Running sudo “apt-get update”
Running “sudo apt-get update” is important as
- It keeps your package index updated, ensuring that when you install or upgrade software, you get the latest versions available.
- It helps resolve dependencies correctly when installing or upgrading packages, ensuring compatibility and stability.
- It ensures that any security updates and patches available for installed software are also reflected in your system.
Next, run “sudo apt -get upgrade -y” as shown in the screenshot below.
sudo apt -get upgrade -y
After running sudo apt-get update, you would typically follow it up with “sudo apt-get upgrade” to upgrade installed packages to their latest versions based on the updated index.
upgrade: This specific command “upgrade,” as opposed to “update,” tells apt-get to upgrade all the installed packages on your system to their latest versions based on the updated package index. It installs the latest version of installed packages downloaded by the “update” command. It only upgrades packages that do not require the removal or installation of other packages.
-y: This option automatically answers “yes” to any prompts that might appear during the upgrade process. It allows the command to run without requiring user confirmation for each package that will be upgraded.
To install OpenVAS, run “sudo apt install openvas”. On the Continue? Prompt type y (for yes) and press enter, as shown in the screenshot below.
sudo apt install openvas
Post-Installation Setup
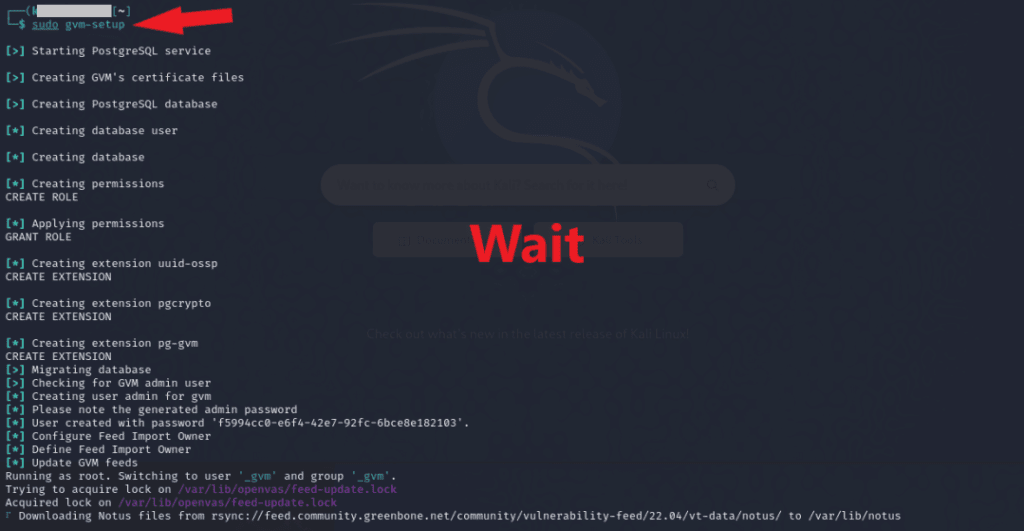
Once the installation is complete, run “the “sudo gvm-setup” to initialize OpenVAS. Wait! this may take some time as it downloads necessary updates and configures the environment. It may take up to two hours.

The admin login credentials were created by default during the installation, and the details were printed on the screen. If you missed or forgot the password, the only way around it is to change the admin password or create a new user account. To change the admin password, run “sudo runuser -u _gvm — gvmd –user=admin –new-password=<Password>” replacing “<Passwor>” with your new password as shown below.
sudo runuser -u _gvm -- gvmd --user=admin --new-password=p123456
To create a new OpenVAS user account, run “sudo runuser -u _gvm — gvmd –create-user=admin2 –new-password=<Password>” replacing “<Passwor>” with your new password as shown below.
sudo runuser -u _gvm -- gvmd --create-user=admin2 --new-password=P01234567To verify your installation, type “sudo gvm-check-setup” and press enter
sudo gvm-check-setup
You should get a message showing that the installation was completed without error “It seems like your GVM-23.11.0 installation is OK.” as shown in the screenshot below.

You can also verify the installation as shown below.

To start OpenVAS services, run “sudo gvm-start” as shown below.
sudo gvm-startThis command starts the OpenVAS services and provides you with the URL to log in, as shown in the screenshot below.

To stop OpenVAS services, run “sudo gvm-stop”
sudo gvm-stopNow, open your Firefox and browse to the provided URL. For this example, “https://127.0.0.1:9392″ was provided. It warns you about potential security risk. Click on the Advanced button.

Click on the Accept the Risk and Continue button.

Next, type in your OpenVAS admin username and password obtained during the installation. If you don’t have it, see how to change the admin password above.

The installation was completed successfully. See the screenshot of the OpenVAS dashboard below.

Conclusion
You have successfully installed and configured OpenVAS on Kali Linux. With this powerful tool, you can now perform comprehensive vulnerability assessments and strengthen your security posture. Remember to only scan targets that belong to you or have legal permission to scan. If you found this guide helpful, please share it with others in the cybersecurity community.
