Table Of Contents
How to Set Up and Configure Microsoft Sentinel
In today’s fast-evolving digital landscape, businesses are continuously facing security challenges. Microsoft Sentinel is an intelligent cloud-native security information and event management (SIEM) solution designed to provide advanced threat detection, visibility, and automated response capabilities. With the growing number of cyber threats, configuring a robust security solution like Microsoft Sentinel is essential to keep your data and infrastructure safe.
In this step-by-step guide, I will walk you through the process of setting up and configuring Microsoft Sentinel, ensuring you can maximize its capabilities to protect your organization from malicious activity.
What is Microsoft Sentinel?
Microsoft Sentinel is a comprehensive cloud-based security information and event management (SIEM) solution that allows organizations to efficiently detect, investigate, and respond to security threats across their enterprise. Sentinel collects, analyzes, and visualizes security data from various sources, using built-in AI and automation to reduce manual efforts and improve response time.
Why Use Microsoft Sentinel?
- Comprehensive Threat Detection: Leverages AI and machine learning to detect advanced threats.
- Scalability: As a cloud-native solution, it scales as your organization grows.
- Integration: Seamlessly integrates with Microsoft and third-party products, creating a unified security platform.
- Automation: Automates repetitive tasks such as threat responses, alert generation, and more.
Prerequisites for Setting Up Microsoft Sentinel
Before diving into the setup process, ensure you have the following prerequisites in place:
- Azure Subscription: Ensure you have an active Azure subscription.
- Permissions: You should have the necessary permissions to create and manage resources in Azure.
Create a Microsoft Sentinel Instance
Log in to the Azure Portal. Search for Microsoft Sentinel in the search bar and select Microsoft Sentinel from the results.

In the Microsoft Sentinel dashboard, click on + Create.

On Add Microsoft Sentinel to a workspace page, click on + Create a new workspace.

Choose the correct Subscription, select an existing Resource group, or create a new one. Give your workspace a meaningful Name and select a Region. Click Review + Create,

Click on the Create button.

Add Log Analytic Workspace to Sentinel
Click on Microsoft Sentinel >Create, and select the Log Analytics Workspace that you want to associate with Sentinel. Click the Add button.

Next, we are going to connect data sources to Microsoft Sentinel. For this example, I am going to connect Microsoft Defender to Microsoft Sentinel.
How to Connect Microsoft Defender XDR data with Microsoft Sentinel
Click on Content management, then click on Content hub. Or click on Go to Content hub from the Microsoft Sentinel dashboard, as shown below, to install the Microsoft Defender connector.

Click on Content management, then click on Content hub. Or click on Go to Content hub from the Microsoft Sentinel dashboard, as shown below, to install the Microsoft Defender connector. Type Defender in the search box and press enter. Select Microsoft Defender for Endpoint and click on Install. This will install all the dependencies.

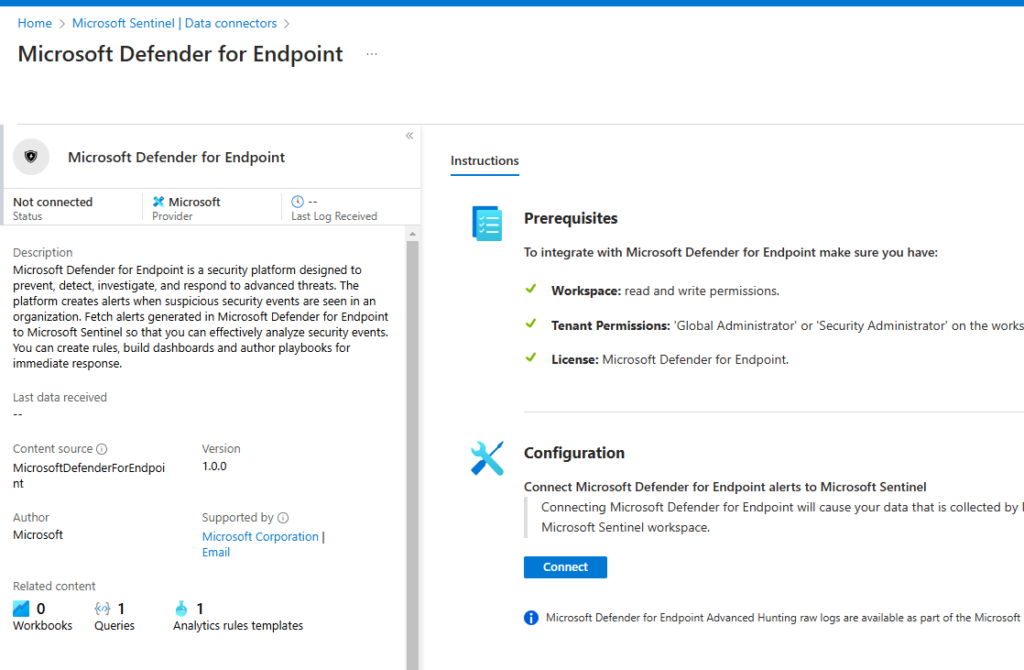
Click on Data connectors, select Defender for Endpoint, and click on the open connector page button, as shown below.

Click on the blue Connect button under Configuration.

The Microsoft Defender for Endpoint was connected successfully, as shown below. Click here to learn how to analyze malware incidents in Microsoft Sentinel.

Set Up Dashboards and Visualizations
To get a quick overview of your security posture, you can create custom dashboards and visualizations
In Microsoft Sentinel, click on Workbooks under the Configuration section. Click on + Add Workbook to create a new workbook.

For this example, I will install the Workspace Usage Report. Select Workspace Usage Report and click on the Install button, as shown below.

Click on Configuration.

Select Workspace Usage Report and click Save.

Select a location to save the workbook and click on Yes. For example, East US.

The workbook was created successfully, as shown in the screenshot below. You can customize your workbook to meet your needs.

